| Remove and Repair: 1999 - 2004 Jeep® Grand Cherokee® front left / right door panel |


| Loose Door Panel? Go from this... |
...to this in under 30 minutes.
Easy DIY fix any one can do.
Easy DIY fix any one can do.


| First step is to pop off the small plastic cover up by the side view mirror. |
| Save the cover. It is just pressure fit in place and pops out with little effort. |
| Remove the screw from behind the cover. (Keep this and all small parts in the center cup holder to prevent losing them.) |
| Remove the screw from the arm rest area. |
| Remove the Torx T-25 from the door handle cup. Note: Some resourceful Jeepers have reported using flat head screw drivers to remove this oddly placed Torx Screw. |
| All screws are now out. Grab the map pocket below and work the panel away from the door. |
| This should be really easy as most of the clips have broken and only a few still have staying power. If you still have some tabs holding tight, you may want to purchase a set of the Prylon hand tools to assist. |
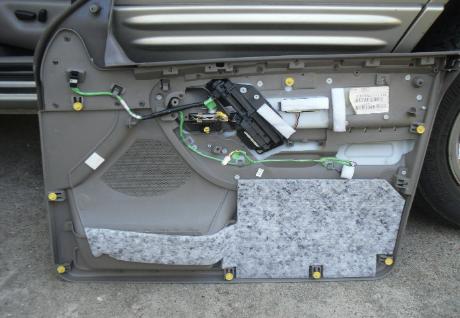
| When it starts to come off, it happens pretty fast. This is an image looking down on top of the Grand Cherokee® door panel as it gets popped off for repair. |
| (Looking down on door) Here you see the main plug for the power windows and locks. Unplug it by pressing the white lock tab in and jiggling it out of the socket. |
| There are two steel rods in each door. Rotate the retaining end off the rod with your thumb to release the rod. Be easy here - you can very easily break these if you flex the retainer up to high. |
| Here the rod has been removed. Repeat the procedure for the second rod below. |
| **Not all Grand Cherokee® have this** Disconnect the small white plug. This plug is for vehicle memory settings. |
| This black plug is for the power mirrors. Unplug it by pressing on the small tab for release |
| Everything is disconnected and the panel should easily separate from the door. |
| Set the door in a safe place to work on. Remove the old tabs and install the new ones. |
| Old broken tab being removed. Use your thumb to press the lock tab towards the door as you pull up with your fingers. |
| Slide the 10 new tabs in place. |
| When reinstalling the door, use one knee to balance the door while you work it into place with your two hands. If you have a friend close by, they can help hold the door up while making your final connections and plug-ins. |
| Align one or two of the tabs and get them just barely started. Only enough to hold the panel up by itself. Next, use your fingers to help align the tips of the new tabs into the steel holes of the door. |
| Put all your screws back in place. Now your Jeep Grand Cherokee door panel has been reinstalled successfully. |

| Once you are sure that they all align, firmly push the panel into place. A firm fist or palm smack to the door panel near the tabs locations really helps seat the panel firmly. |


| I noticed this upper weather seal was bent out of shape from the continuous movement of my loose door panel. I spent some time flexing it back into shape to seal the top of my door panel the way it was supposed to be. |
| (Jeep Grand Cherokee Passenger Door) The right side has been flexed back into position to cover the gap between the plastic panel and the door. You can clearly see the transition from good to bad. |

| (Jeep Grand Cherokee Passenger Door) Flex the steel reinforced weather strip back into position using your fingers and thumbs. This piece is very easy to flex and retains it shape once bent, so go easy and don't over do it. |

| Use your finger to slide the top rubber weather strip up and over the edge of the panel for final fit. |
Jeep® Grand Cherokee® door panel pop tabs and tees will wear out over time resulting in a loose fit. This can be
fixed by just about any DIY repair man or woman with a few simple hand tools you most likely already own. Each door
panel has 10 tees that will need to be replace to put your Jeep® back together and have it fit like it was factory
showroom fresh. Time to complete each door approx. 15 - 20 minutes.
fixed by just about any DIY repair man or woman with a few simple hand tools you most likely already own. Each door
panel has 10 tees that will need to be replace to put your Jeep® back together and have it fit like it was factory
showroom fresh. Time to complete each door approx. 15 - 20 minutes.
| 100% Guaranteed to tighten up your door panels. Be sure to order 2 sets if both doors are loose. |
| 1999 - 2004 Jeep® Grand Cherokee® step by step door panel removal process. |
| ||||||||||||
| |
| |
| |
| |
| |
| |


|
* Chrysler Group LLC has neither licensed nor endorsed JGCParts to sell goods and services for Jeep® vehicles.
Jeep® and Grand Cherokee® are registered trademarks of Chrysler Group LLC. JGCParts is not in any way
associated with Jeep® or Chrysler Group LLC.
Jeep® and Grand Cherokee® are registered trademarks of Chrysler Group LLC. JGCParts is not in any way
associated with Jeep® or Chrysler Group LLC.